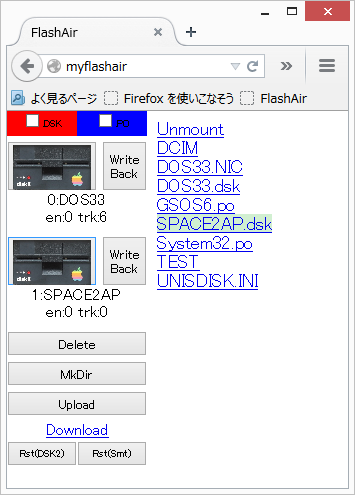

By using a UNISDISK with a FlashAir, you can not only upload, download images but also control the UNISDISK such as mounting images and resetting the UNISDISK via WiFi.
Toshiba FlashAir W-02
First of all you need to update the firmware of the UNISDISK to version 2015.04.30.
Unfortunately current bootloader of UNISDISK doesn't recognize a FlashAir. Please use the normal SD card attached to a UNISDISK for updating the firmware.
You'd better use a FlashAir in station mode when used with a UNISDISK.
About 10 seconds after turning the power of the Apple II ON, you can connect with it from a PC via WiFi. Access http://myflashair/ (http://myflashair.local/ when using Mac) by Chrome or Firefox browser.
Click Upload button and then select a file to upload on the file dialog.
Click a .dsk file (in DISK II mode) or a .po file (in SmartPort mode) then the file name highlights, and click a disk drive button to mount the image.
Click Unmount, and then click a disk drive button to unmount the drive.
Click a file then the file name highlights. Click the Delete button to delete the file.
Click the MkDir button, and then input a folder name.
Double click a folder name, and you can enter into the folder.
Double click ".." to move to the parent folder.
Click a file then the file highlights. Then click the Download link.
Click the Rst(DSK2) button to reset the UNISDISK in DISK II mode.
Click the Rst(Smt) button to reset the UNISDISK in SmartPort mode.
Check the red .DSK check box to filter out other than .DSK files.
Check the blue .PO check box to filter out other than .PO files.
To write back data on a .NIC image (that is used by UNISDISK for actual operation) to the .DSK file, click Write Back button.
Don't eject the FlashAir when using a UNISDISK with a FlashAir.